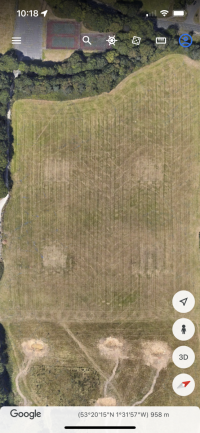
Sorting out the drainage in the lower field and other gubbins. An apprentice digger driver writes.

diggerjones

diggerjones

Well-known member
This shows how good drainage guys were and how serious they took their job . Think of the length of time this would of taken done by hand .
I also love the fact it was all mapped out .
Now everyone wants a digger to do it all in a day with a roll of wavin coil.
Dug by hand. From the top. Not enough room to get in a 3" wide trench 6' down
 
Giles

Giles

Well-known member
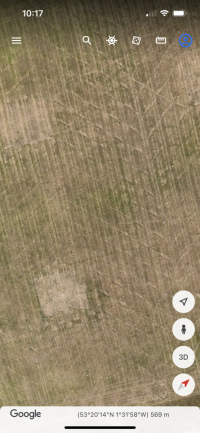
I wish I had a map like that for mine. So the darker lines are the pipes in your pic? What are the closer together finer lines? How was the water getting into the pipes?
Dry summers get someone with drone should show up nicely, this is from satellite but shows it up
 

Attachments

  • 5666B5A6-250A-410B-B7BE-70486F249394.png
    5666B5A6-250A-410B-B7BE-70486F249394.png
    1.1 MB · Views: 255
  • F7DD251A-9366-48A2-AC1C-C86AF34D196B.png
    F7DD251A-9366-48A2-AC1C-C86AF34D196B.png
    1 MB · Views: 251
L

LKSF

Pennine Hillbilly
It's good to see some pics of how the professionals do it, thanks for those. Back to my more basic efforts though 😄
I started off by knowing absolutely nothing about draining land, so it's been a big learning experience. The good thing about living on the job and not having to do it in X amount of time is it helps a rookie.
In Winter I often wander around after it's been raining and watch which bits get marshy and have water running out of or over them, planning what to do for a while. Then when we get a break from the weather and the ground firms up a bit trundle down with the digger and pull some trenches. After that watch them hopefully fill up, drain the ground and it firm up.
If that's successful then lay some pipe and gravel in to finish off.
I think being on steep sloping ground makes it difficult, it's not obvious why the ground is boggy in certain areas and stays like that for weeks.

The obvious one at the bottom of this pic has been fixed! White patches are firm, dark green is very soft:

20220307_151209.jpg


20220307_151209 (2).jpg


The yellow dots are where the drain is and behind me is now flowing well, it's the main drain - the M1.
Blue is a boggy area, you won't get up there in Winter in anything with wheels on, red is also very soft.


Green is also bad, it's covered in Soft Rush which a is a big clue.

20220307_151209 (3).jpg


thumbnail_20230324_181850.jpg


I dug this one first and joined it to a pipe I laid earlier. I'd read somewhere it's best to start at the bottom and work your way up, but this is wrong. You can see water running down it already.

This is the blue area

20230424_123244.jpg


20230424_123310.jpg


That seems like quite a lot of pipe in a small area and I could have gone on and on further down, but where do you stop?
I've learned to skim off the turf and leave it to one side, then lay it back on the gravel so it grows back quicker. Also to dig shallower trenches!

Prior to that right at the top a few other trenches were dug which flowed well so had pipes laid in them too. The inlaws came down to stay so I took him out to get away from his wife for a while and do some diggering

20230424_123214.jpg

20230424_123156.jpg


thumbnail_20230314_102420.jpg


An old drain was dug up and repaired.

I've had to hold back from hiring a rotavator to finish it all off so I can rake it level....
 
Last edited:
diggerjones

diggerjones

Well-known member
That's an amazing amount of drainage, do you know roughly how far apart the narrowest are? I've been doing a bit more hence my question!
Normally 8 yards. But always fairly deep. Say 5 or 6 foot.
There's a science to the diameter of pipe. Large is not good. Small pipe concentrates the water in the bottom of the pipe. More flow/speed . It then fetches the sand out
 
L

LKSF

Pennine Hillbilly
Normally 8 yards. But always fairly deep. Say 5 or 6 foot.
There's a science to the diameter of pipe. Large is not good. Small pipe concentrates the water in the bottom of the pipe. More flow/speed . It then fetches the sand out

Yes I've come to that conclusion too just recently after a lot of thought and watching, there wasn't enough water flowing after fairly heavy rain to fill a 2" pipe so all the last pipes were 50 or 60mm. A lot cheaper too! The only thing I didn't like was I had to buy huge universal pipe junctions as they were the cheapest by far. So i've got 50mm pipe with 100mm junctions.

It's more complicated than it first looks that's for sure, trying to find out where the water is coming from, why it's not draining away and then asking how quickly you want it to firm up after heavy rain. I think some of these areas will still go soft, but won't be sure until next Winter. From what I saw they'll firm up after a week or two though.
It'll be interesting to see how it fairs in Summer, if or when when it dries out too.
 
S

Smiffy

Well-known member
Yes I've come to that conclusion too just recently after a lot of thought and watching, there wasn't enough water flowing after fairly heavy rain to fill a 2" pipe so all the last pipes were 50 or 60mm. A lot cheaper too! The only thing I didn't like was I had to buy huge universal pipe junctions as they were the cheapest by far. So i've got 50mm pipe with 100mm junctions.

It's more complicated than it first looks that's for sure, trying to find out where the water is coming from, why it's not draining away and then asking how quickly you want it to firm up after heavy rain. I think some of these areas will still go soft, but won't be sure until next Winter. From what I saw they'll firm up after a week or two though.
It'll be interesting to see how it fairs in Summer, if or when when it dries out too.

It all depends on the pipe your using but sometimes you can get a better joint with a hole saw. Usually better if the branch is smaller than the main line. But can be done with same size with a bit of care
 
Furniss

Furniss

Well-known member
I worked for a land drainage firm for 7 years or so, land drainage was the thing but with the subs coming off they were diversified into other things.
We always used 100mm for laterals and I wouldn't go smaller than 80mm - drains want to be be out of harms way depths wise and gravel up relatively close to surface, think they used to say they drew 7m each side but that would be ground condition dependant I guess.
We used to use those big daft junctions too.
 
L

LKSF

Pennine Hillbilly
It all depends on the pipe your using but sometimes you can get a better joint with a hole saw. Usually better if the branch is smaller than the main line. But can be done with same size with a bit of care
What kind of pipe and joint would you be using to be able to use a hole saw? All I've seen is stepped, cut and clip together stuff so far.
 
JD450A

JD450A

Feral as Fk 🐾
I like to do joints under 4" using older clay tiles (pipes) with the modern pipe stuffed in and lots of gravel.

As for depth, it's all depending on if your draining surface water or rising water..... I've been running drains at 2m depth on one job to pick rising water below the clay layer.
 
S

Smiffy

Well-known member
What kind of pipe and joint would you be using to be able to use a hole saw? All I've seen is stepped, cut and clip together stuff so far.

It's when doing t or y joints. So for example if putting in herringbone drainage with a 100mm centre line and 75mm branches you can drill a 75mm hole in the side of the 100mm pipe and push it in. If using perforated pipe you don't even need to seal it.
We have done this on all types of pipe from black ridges Flexi land drain through to soil pipe large twin wall and even concrete pipes. The bigger the size difference between the two pipes the better the joint is.
 
Giles

Giles

Well-known member
I was shown by the guys running the great big mastenbroke trencher when they did our rugby club they’d never cut the 100mm/4” main to use the plastic Y joiners they’d split them in half then with a wickedly sharp little pen knives they’d cut a 2-3” hole in line with branch then cable tie the joint rd the 80mm branch to the 100mm main.
 
B

bobthebuilder

Well-known member
It's when doing t or y joints. So for example if putting in herringbone drainage with a 100mm centre line and 75mm branches you can drill a 75mm hole in the side of the 100mm pipe and push it in. If using perforated pipe you don't even need to seal it.
We have done this on all types of pipe from black ridges Flexi land drain through to soil pipe large twin wall and even concrete pipes. The bigger the size difference between the two pipes the better the joint is.
have to be carefull not to cause an obstruction in the 100mm pipe ?
 
S

Stroppymonkey

Well-known member
didn't know that
I really wanted to buy one of these but I finally got hold of the chap and hes packed up. Seems a really good concept as its designed to fit a mainstream product. Dont think he could get anyone to take it on.
 
L

LKSF

Pennine Hillbilly
Now then where were we, oh yeah 2023, the year of extreme wind, rain and theft. I'll put a heading at the top of each chapter so if it doesn't interest you you can skip it and you won't have missed anything.

Gardening

If you flick back a couple of pages you'll see me sorting out this small piece of land by the entrance gate, it then had 3 plum trees put along near the wall and wildflower seeds sown which made for a good display for many months in Summer and early Autumn:
20230703_122747.jpg


20230719_131544.jpg


It's reasonably maintenance free, good for pollinators and also the birds and mice have a chance at the seeds produced in Autumn. The soil doesn't need touching at all, just left as nature intended.

The only problem is the flowers battle with the grass and the grass can eventually win, overcoming the flowers. To help stop that a flower called Yellow Rattle is sown, this battles with the grass and usually wins, so some seeds of that are now in the ground. They need a cold period to trigger them to grow in Spring, this and all of the seed heads left from those ^ were sown late Autumn, I just hope that something didn't go and hoover them all up before they nestled into the soil. This has a nasty habit of happening around here.

Once it's all died back during Winter the whole lot is cut down and left in the hope that the seeds take and it comes back next year. You can of course leave less to chance and buy new seeds every year.

Fruit and veg growing

A few pages back you'll see I had to construct some cheap temporary raised beds to grow in, this was because the ground where I had to grow was full of stones, not just small ones either. You can grow many things in stony ground, it depends how stony and what you want to grow.
There are pros and cons to raised beds, but the correct place to grow most stuff is in the ground so i've been converting the plot to that.

thumbnail_20230404_124915.jpg


The digger bucket is 4ft wide which is the recommended width of a bed, I went about a foot deep and left a foot in between each one for a path.
The first two beds were filled with soil i'd previously bought in and some I picked up for free. This soil was fairly normal, some stones and a bit of clay, the latter easily dealt with.
What came out was taken away and piled up to dry as much as possible before being shovelled into the rotary riddle or screener i'd made:

thumbnail_20230409_125246.jpg


As you can see it's an old mixer I picked up for £40 and blasted hundreds of holes through it with the plasma cutter. It's showing some signs of wear now on the drive pinion because the grit and soil constantly falls into it, but it's produced many tons of stone free soil now.

20230505_200954.jpg


The stones have been used as hardcore for paths here and there.

Whilst the soil is now stone free it's also pretty lifeless, it'll need plenty of organic matter to bring it up to a decent healthy standard, but it's a good basis now for growing root veg in like carrots and parsnips. These two need loose reasonably deep, fertile, stone free soil otherwise you'll end up with bent, forked roots.

Non organic farms just use the soil to prop up a plant and give it water, they feed the plants chemical fertilisers, but they don't feed the soil so it's essentially dead. What's been realised in recent years is that it's much better to feed the soil, which then feeds the plants. Everything is happy, the plants harvested taste better because of it, are healthier for us and chemical free.
Gardeners noticed that many farmers don't plough and rotovate anymore, they realised that often it's not needed and actually makes thing worse in many ways. Farmers call it tilling, they'll harvest a crop, apart from adding fertilisers they leave the soil unturned, just maybe a light surface till and/or just drill the seed straight in.
So we've stopped digging too and crop yields have gone up. Americans call it 'No-till', we call it 'No-dig'. I won't go over the whole process unless you're particularly interested, but basically once the soil is in good condition (and it might be right from the start) it's left unturned, just a layer of compost is laid on top to feed it the organic matter, the good bacteria and nutrients it needs to keep it healthy. Nature does the rest as it does anyhow if you think about it. Nobody goes into the forests or countryside and digs the soil to help, it feeds itself. Whatever ends up on top gets taken down by rain, frost, worms etc.
Why we have to get involved is simple - the nutrients from the soil end up in the produce, we then take it away and eat it. So all we're doing is putting back on the surface what we took away to keep the balance.

Farmers have 'muck spread' for decades and it works, so we now do our version by laying compost on top and leaving nature to sort it out. People have done side by side trials and the beds in which the soil was never disturbed consistently grew better and more produce.

This is how the first 3 beds looked like planted out in Spring:

thumbnail_20230415_174202.jpg


thumbnail_20230416_195658.jpg


By early Summer things were coming along nicely:

20230603_193318.jpg


The grass had started to grow back and creep into the beds though, I figured some edgings would be a good idea and a load of small roof tiles which came up for free were picked up locally:

20230727_170452.jpg


20230820_202725.jpg


20230728_080053.jpg


I can maybe use the holes in the tiles to fix a tile batten to, to that then I can fix various different sheets. In Spring a thin piece of fleece warms the soil and protects seedlings from critters and frost. I could put a woven membrane across to stop weeds from coming through, also clear polythene and mesh over hoops, again for protection. Something always wants to eat your veg before you do, it's a never ending battle to stave it off.

Every farm has a bath in a field, I pulled ours into the PT to warm it up a bit to plant carrots in.
thumbnail_20230510_125853.jpg


Then dragged back out once the weather had warmed up a bit:

20230520_123942.jpg


A plastic tank was utilised to grow huge carrots in:

20230811_151434.jpg
 
Top