The 'Today's Job' thread

Left hooker

Left hooker

Well-known member
It's the twist in pipe as it's quite a ridged type of pipe and it's undoing the fittings the hoses attach to and the dowty washer don't need a lot to leak past
Creamed them right up this time and held ferrule crimp with stilsons so I wasn't adding extra tension by letting pipe twist while tightening up
 
JD450A

JD450A

Feral as Fk 🐾
1666895885090.png
 
Gunners

Gunners

Well-known member
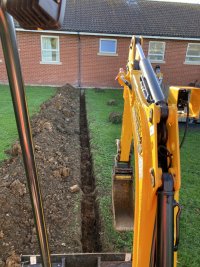
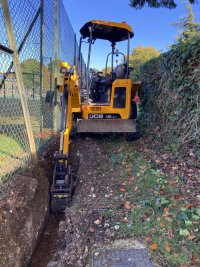
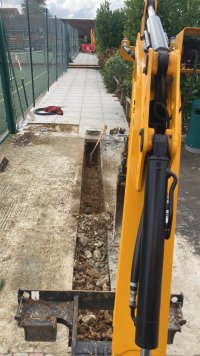
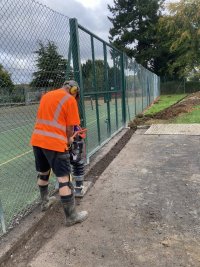
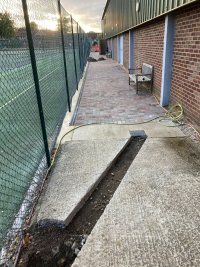
For those that don't do Instagram (you're missing out, my karaoke is 2nd to none :LOL: ) I'm installing ducting, cables and columns for a floodlight scheme on some tennis courts this week. Progress pics so far. Not sure how I'm going to erect the columns yet - found out they are 9m long and weigh 250kg a piece... probably should have known that before I put the price in :rolleyes: but where there's a will there's a way.
 

Attachments

  • 2022-10-17 16.12.43.jpg
    2022-10-17 16.12.43.jpg
    315.4 KB · Views: 153
  • 2022-10-18 14.37.15.jpg
    2022-10-18 14.37.15.jpg
    395.5 KB · Views: 142
  • 2022-10-25 14.41.29.jpg
    2022-10-25 14.41.29.jpg
    226.8 KB · Views: 134
  • 2022-10-27 14.44.51.jpg
    2022-10-27 14.44.51.jpg
    380.4 KB · Views: 137
  • 2022-10-27 17.02.26.jpg
    2022-10-27 17.02.26.jpg
    419.5 KB · Views: 142
V8Druid

V8Druid

do it as well as you can,but learn to do it better
For those that don't do Instagram (you're missing out, my karaoke is 2nd to none :LOL: ) I'm installing ducting, cables and columns for a floodlight scheme on some tennis courts this week. Progress pics so far. Not sure how I'm going to erect the columns yet - found out they are 9m long and weigh 250kg a piece... probably should have known that before I put the price in :rolleyes: but where there's a will there's a way.
last pic looks to be an interesting 'dig' :oops:

chain the col.s to the bucket flat and upright 'em with the machine?? (and maybe a little help at the long end , working back towards the base)?
 
TiltyShaun

TiltyShaun

Well-known member
For those that don't do Instagram (you're missing out, my karaoke is 2nd to none :LOL: ) I'm installing ducting, cables and columns for a floodlight scheme on some tennis courts this week. Progress pics so far. Not sure how I'm going to erect the columns yet - found out they are 9m long and weigh 250kg a piece... probably should have known that before I put the price in :rolleyes: but where there's a will there's a way.
Lamp post a bit easier than you think. Concrete a suitable size pipe in the ground that is about 50mm bigger in diameter than the bottom of the column. With a digger and a suitable strap you should be able to get one end in the pipe and lift the column up and slide it in. Connect and concrete and settle the consultation invoice!!
 
V8Druid

V8Druid

do it as well as you can,but learn to do it better
Lamp post a bit easier than you think. Concrete a suitable size pipe in the ground that is about 50mm bigger in diameter than the bottom of the column. With a digger and a suitable strap you should be able to get one end in the pipe and lift the column up and slide it in. Connect and concrete and settle the consultation invoice!!
think these may be a bit 'more' than a simple lamp post Shaun, at 250kgs for a 9 m :oops:
 
Gunners

Gunners

Well-known member
Lamp post a bit easier than you think. Concrete a suitable size pipe in the ground that is about 50mm bigger in diameter than the bottom of the column.
I did think about this but didnt know if I would be able to get the cable up through the hole in the post with it inside a sleeve
 
S

Smiffy

Well-known member
I did think about this but didnt know if I would be able to get the cable up through the hole in the post with it inside a sleeve

It's how they do highways lighting. Or atleast a certain brand off them.
The outer pipe isn't much bigger atall and they just pour kiln dried sand down the gap. Not even concrete.

There was a jcb pole carrier on ebay the other week. For really quick installation
 
Giles

Giles

Well-known member
For those that don't do Instagram (you're missing out, my karaoke is 2nd to none :LOL: ) I'm installing ducting, cables and columns for a floodlight scheme on some tennis courts this week. Progress pics so far. Not sure how I'm going to erect the columns yet - found out they are 9m long and weigh 250kg a piece... probably should have known that before I put the price in :rolleyes: but where there's a will there's a way.
perfect job for extra dig on 3cx haha
 
T whiting

T whiting

Well-known member
It's how they do highways lighting. Or atleast a certain brand off them.
The outer pipe isn't much bigger atall and they just pour kiln dried sand down the gap. Not even concrete.

There was a jcb pole carrier on ebay the other week. For really quick installation
20mm gravel works well too don't be tempted to drop anything in to wedge it it tends to move and lead to disaster

The 3cx should easily handle the posts yo dont need to be more than a third up the column when lifting them there usually bottom heavy
 
A

AusDave

Well-known member
Speaking of preventative maintenance, my old Peugeot 405 is due for a roadworthy check and I knew I had to replace one of the front wheel bearings. This is not a pleasant job and can require some cursing to complete the job. However I've done it before so I know what I need to do.

However I noticed when I was disassembling things that the CV joint boot had failed. A small tear, had lost some grease but didn't look like any dirt had got in. So another issue to deal with :( I also wanted to do it the easy way and soon, as the roadworthy had to be done within a few days or I wouldn't be able to get the old girl registered. After some faffing about online I figured the easiest way was to do the CV boot fitting on the car while I had the wheel bearing hub assembly off without removing the driveshaft and using a universal CV joint boot.

I saw on Youtube how to do this using a cone but when I went to town to get the CV boot nobody had a cone for sale so all I had was the boot. I took some funnels from the kitchen thinking they may be helpful but they looked a the wrong angle when I got to the shed. After wandering around and thinking hard I went looking for some PVC downpipe I had in some long grass. I found a short section with a bell end and cut a piece out so I could form a bit of a cone. With the application of a heat gun and lashings of duct tape I reckoned I had made a pretty good example of a CV boot fitting cone :)

The real test would be slipping the new boot over the bearing hub which was 90mm diameter while the narrow end of the boot was 20mm diameter :oops:
I oiled up the boot and turned it inside out and oiled up the home made cone. I slipped the boot onto the cone, put the cone on the bearing hub and started pushing. In one easy push the boot slipped up the cone and over the hub :DEasier than I thought I would be. Hardest bit was turning the boot from inside out back to normal as it was so slippery. Got it done, filled it with grease, tightened the clamps, put the hub assembly/wheel back on and drove it home.
The old Peugeot has 480,000 km on the odometer and the last 120,000km on 50/50 waste vegetable oil and diesel. Cheap to run and performs well. But it's from 1994 and more things will wear out, so when I run out of my veggie oil stockpile I'll be looking for something newer. Hopefully a decent plug in hybrid to use some of my excess solar power :)

IMG_2772.jpeg
IMG_2773.jpeg
 
Lancs Lad

Lancs Lad

Well-known member
Speaking of preventative maintenance, my old Peugeot 405 is due for a roadworthy check and I knew I had to replace one of the front wheel bearings. This is not a pleasant job and can require some cursing to complete the job. However I've done it before so I know what I need to do.

However I noticed when I was disassembling things that the CV joint boot had failed. A small tear, had lost some grease but didn't look like any dirt had got in. So another issue to deal with :( I also wanted to do it the easy way and soon, as the roadworthy had to be done within a few days or I wouldn't be able to get the old girl registered. After some faffing about online I figured the easiest way was to do the CV boot fitting on the car while I had the wheel bearing hub assembly off without removing the driveshaft and using a universal CV joint boot.

I saw on Youtube how to do this using a cone but when I went to town to get the CV boot nobody had a cone for sale so all I had was the boot. I took some funnels from the kitchen thinking they may be helpful but they looked a the wrong angle when I got to the shed. After wandering around and thinking hard I went looking for some PVC downpipe I had in some long grass. I found a short section with a bell end and cut a piece out so I could form a bit of a cone. With the application of a heat gun and lashings of duct tape I reckoned I had made a pretty good example of a CV boot fitting cone :)

The real test would be slipping the new boot over the bearing hub which was 90mm diameter while the narrow end of the boot was 20mm diameter :oops:
I oiled up the boot and turned it inside out and oiled up the home made cone. I slipped the boot onto the cone, put the cone on the bearing hub and started pushing. In one easy push the boot slipped up the cone and over the hub :DEasier than I thought I would be. Hardest bit was turning the boot from inside out back to normal as it was so slippery. Got it done, filled it with grease, tightened the clamps, put the hub assembly/wheel back on and drove it home.
The old Peugeot has 480,000 km on the odometer and the last 120,000km on 50/50 waste vegetable oil and diesel. Cheap to run and performs well. But it's from 1994 and more things will wear out, so when I run out of my veggie oil stockpile I'll be looking for something newer. Hopefully a decent plug in hybrid to use some of my excess solar power :)

View attachment 40841View attachment 40842

Fair play...it's a crap job even with the correct cone tool. The first ones used to split just as you'd got them over....bad words ensued🤬🤬
 
Top